Bluetooth trial – part 1
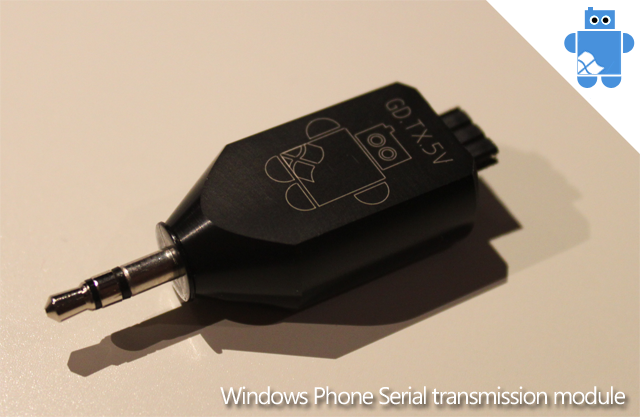
Je n’ai pas encore reçu le récepteur Bluetooth A2DP mais j’ai fini de fabriquer le module de transmission série pour Windows Phone qui se banche sur le récepteur.
I didn’t received yet the A2DP Bluetooth receiver but I finished to make the serial transmission module for Windows Phone which is connected to the receiver.
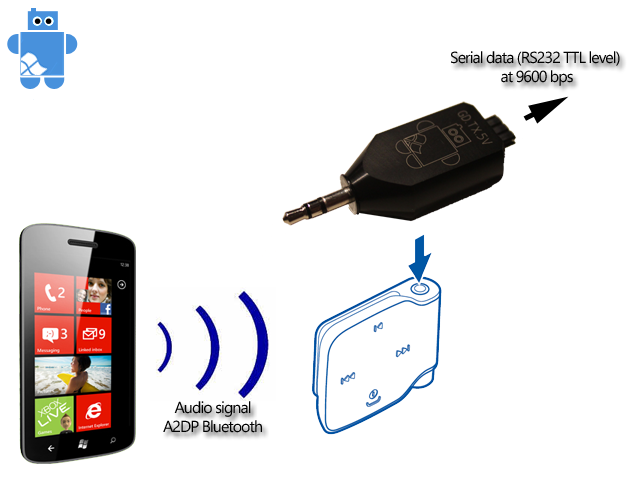
Ce module permet de convertir le signal audio (envoyé par le Windows Phone en Bluetooth vers le récepteur A2DP) en un signal RS232 (niveau TTL) à 9600 bps.
This module allows to convert an audio signal (sent by the Windows Phone over Bluetooth to the A2DP receiver) into a RS232 signal (TTL level) at 9600 bps.
The future is Wireless
Les téléphones Android ont le droit en ce moment à un paquet de petits robots qui se pilotent en Bluetooth. Malheureusement, il y a bien du Bluetooth sur Windows Phone, mais de pas de profil SPP (Serial Port Profile) donc pas de possibilité de piloter des appareils en Bluetooth.
Quelques exemples de petits robots sympas : Phonybotz, Gosphero.
Le port série ayant été vaincu, il s’agit de passer au niveau supérieur : le Wireless.
Android phone have access to a bunch of little robots which can be controlled over Bluetooth. Unfortunately, Windows Phone is Bluetooth compatible, but no SPP profile (Serial Port Profile) so, no possibility to control devices through Bluetooth.
Here are some examples of cool little robots : Phonybotz, Gosphero.
As the serial port is now complete, the challenge is to pass to the next level : Wireless.


Ma première idée : le XBEE.
Je viens de recevoir 2 modules XBEE S1.
My first idea : XBEE.
I just receive 2 XBEE S1 modules.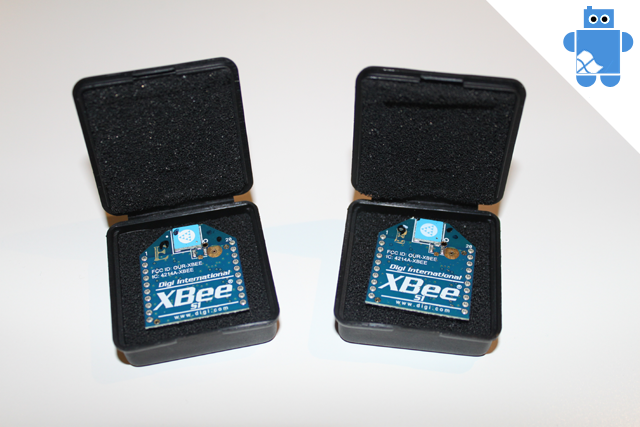
Je vais tester tout ça bientôt en association avec le cable port serie pour Windows Phone.
Les soucis se profilent déjà :
- C’est cher ! il faut 2 modules pour créer le canal sans fil et chacun coute 30€.
- Les XBEE sont duplex mais la vitesse de communication minimum acceptable est de 1200bps. Aujourd’hui, le cable port serie pour Windows Phone permet d’émettre à 9600 bps mais de recevoir à 600 bps. Je ne pourrais utiliser la communication que en transmission donc limité à une utilisation « télécommande ».
- Pas super pratique puisqu’il faut relier le câble série au Windows Phone ainsi qu’au XBEE et ajouter une alimentation 5v…
I am going to test all that in association with the serial port cable for Windows Phone.
Troubles are already here :
- That’s expensive ! It requires 2 modules to create a wireless channel and each one has a cost of 30€.
- XBEE are duplex but the minimal communication speed required is 1200 bps. Today, The Windows Phone serial port cable allows 9600 bps in transmission but only 600 bps in reception. I will only have the capacity to use the transmission so, it is limited to a « remote » application.
- Not really easy to use because, it requires to connect the serial port cable to the Windows Phone, a XBEE module and to add a 5v power supply…
Autre idée ! Windows Phone dispose du profil A2DP en Bluetooth. Ce profile permet le streaming audio du téléphone sur un device compatible.
En utilisant un récepteur A2DP raccordé au câble port série pour Windows Phone, la solution semble beaucoup plus sympa.
- C’est le son qui voyage et pas le signal série.
- On utilise le Bluetooth du mobile, pas de bricolage nécessitant de brancher plein de choses sur le Windows Phone.
- 1 seul récepteur à acheter, donc moins cher que 2 XBee
- Le profile A2DP ne permet pas un échange duplex donc on reste en mode « télécommande » mais c’est déjà cool.
Another idea ! Windows Phone is compatible with the A2DP Bluetooth profile. This profile allows to stream audio signal from the smartphone to a compatible device.
By using a A2DP receiver connected to the Windows Phone serial port, the solution seems a lot nicer.
- That’s the sound which travel and not the serial data.
- We use the mobile bluetooth, no trouble of homemade hacking that requires to connect a lot of stuff to the Windows Phone.
- Only one receiver to buy, so less expensive than 2 XBEE modules.
- A2DP profile doesn’t allow a duplex communication so we stay in a « remote » application but it is already really cool.
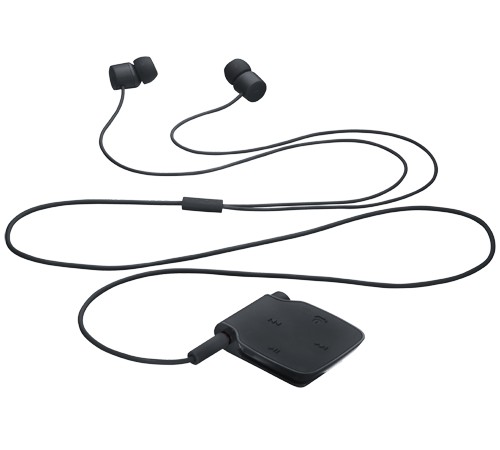
Pour tester ça, j’ai commandé un Nokia BH-111.
To test that, I ordered a Nokia BH-111.
On retrouve des puces intégrables qui permettent l’accès au profile A2DP, comme ici chez FREE2MOVE.
We find some chips that allow an access to the A2DP profile , like here at FREE2MOVE.

Vivement que tout cela arrive que les essais puissent commencer !!
I am in a hurry to receive all that and to start testing !!
Thank you !
Je voudrais remercier WPCentral.com , Smartphonefrance.info, Semageek.com, WP7.huand WMPowerUser.com pour les articles qu’ils ont écrit sur WPBots.com
I want to thank WPCentral.com , Smartphonefrance.info, Semageek.com, WP7.hu and WMPowerUser.com for articles they wrote on WPBots.com.
My first Windows Phone robot – Part 3
Ça y est, j’ai trouvé un moment et le robot est terminé. L’électronique et le code sont finis.
Voilà une vidéo qui montre le robot en action. Deux modes sont présents dans la vidéo :
- Le premier : mode « Télécommande ». Le robot est piloté par l’interface du Windows Phone.
- Le deuxième : mode « Auto ». Le robot est autonome et les informations des capteurs sont envoyés sur l’interface du Windows Phone.
Pour le mode « Auto », j’ai mis en place quelques comportements simples comme chasseur de lumière ou bien des comportements d’évitement d’obstacles.
Le comportement présent sur la vidéo est très simple : Si le capteur IR ne détecte rien, le robot avance, s’il détecte un obstacle il tourne sur la droite. Si le robot détecte un robot très proche, alors il recule.
Here it is ! I found some free time and the robot is over. the software and the electronic are done.
Here is a video showing the robot in action. We can see it through 2 working modes :
- First one : « Remote » mode. The robot is controlled by the Windows Phone interface.
- Second mode : « Auto » mode. The robot is autonomous and the data coming from the sensors are sent to the Windows Phone interface.
For the « Auto » mode, I put in place some simple behavior like a « light hunter » or some behavior to avoid obstacles.
The behavior presents in the video is very simple : If the IR sensor sees nothing, the robot is moving forward. If it sees something, it turns right. If the robot see an obstacle very close to it, it moves backward.
Au niveau électronique, on retrouve :
- - un driver double canal piloté en PWM par la FEZ Panda (2 PWM + 4 sorties digitales pour les modes de marche). Le robot est équipé de deux servos au niveau des roues motrices mais ils ont été modifié pour les convertir en moteur à courant continu à rotation continue (suppression des butées, du potentiomètre et de toute l’électronique).
- - 2 ponts diviseurs de tension permettant de capter le niveau lumineux des 2 photorésistances sur 2 ports analogiques de la FEZ Panda.
- - 1 régulateur linéaire de tension 7805 permettant de convertir le 9v de la pile en 5v.
- - Le capteur IR est directement raccordé à une entrée analogique de la FEZ Panda.
- - Le câble port série pour Windows Phone est relié sur le port COM1 de la FEZ Panda.
In term of electronic, we can find :
- A dual PWM motor driver driven by the FEZ Panda (2 PWM, 4 digital outputs for the working modes). The robot uses 2 servos for the driving wheels but they are modified to convert them into continuous rotation DC motor (No more potentiometer or electronic inside).
- 2 voltage dividers allow to sense light level from the 2 photo-resistors via 2 analogue inputs of the FEZ Panda.
- 1 linear voltage regulator 7805 allows to convert the 9v from the battery into 5v.
- The IR sensor is connected to an analogue input of the FEZ Panda.
- The Windows Phone serial port cable is connected to the COM1 port of the FEZ Panda.
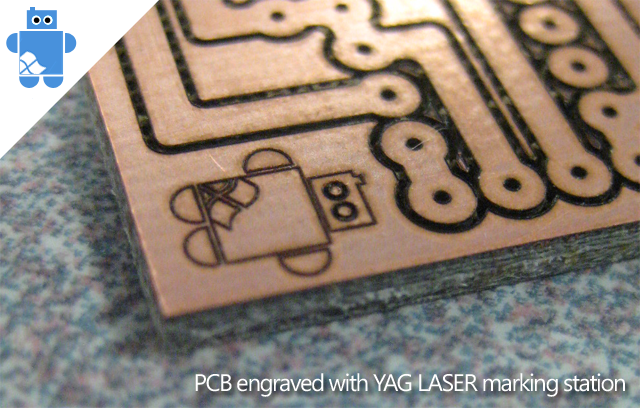
How to engrave a PCB with a YAG laser
Pour mes prototypes, je cherchais une méthode pour réaliser rapidement des PCB de qualité sans les problèmes des méthodes traditionnelles avec des produits chimiques.
J’ai accès à un laser YAG de marquage. J’ai donc tenté l’expérience de graver une plaque de cuivre en utilisant le laser et un fichier DXF modifié du PCB provenant de Eagle-PCB.
For my prototypes, I was looking for a method to quickly make some quality PCB without the trouble coming from the traditional method which uses some chemicals.
I have access to a YAG LASER. I tried to engraved a sheet of epoxy with a layer of copper by using the LASER and a customized DXF file coming from Eagle-PCB.
L’opération consiste à dessiner son circuit dans Eagle-PCB puis exporter le tout en DXF à l’aide d’un script d’export (1).
En utilisant un logiciel de CAO, modifier le DXF en suivant les étapes 2 à 5 de façon à créer le circuit à graver au laser.
The idea is to design the circuit in Eagle-PCB and then to export it into DXF format with the help of an export script (1).
By using a CAD software, you need to transform the DXF file by following steps 2 to 5 in order to create the circuit to engrave with the LASER.
Moyennant une 30ene de passes de gravure et des essais de réglages de paramétrage LASER, le résultat obtenu est très satisfaisant et parfaitement utilisable.
30 passes of LASER and some setup trials later, the result obtains is quite satisfying and completely usable.
My first Windows Phone robot – Part 2
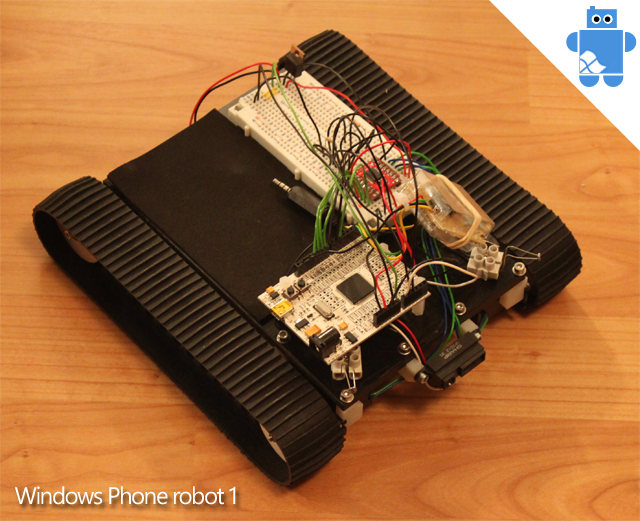
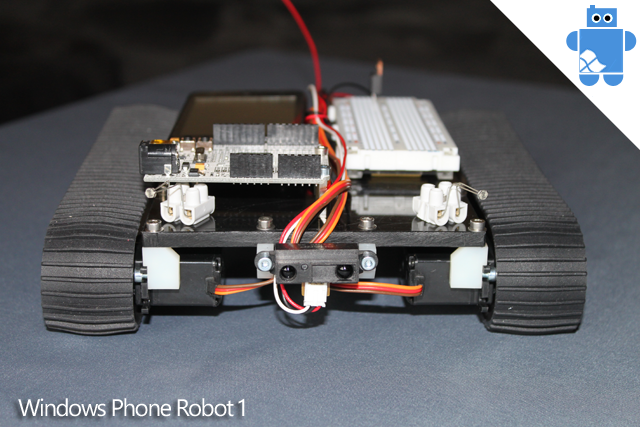
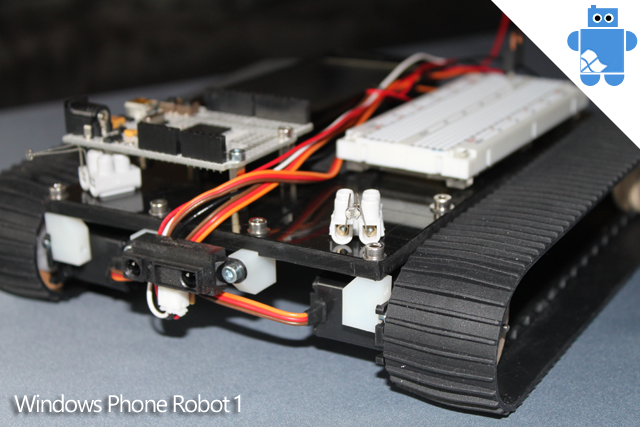
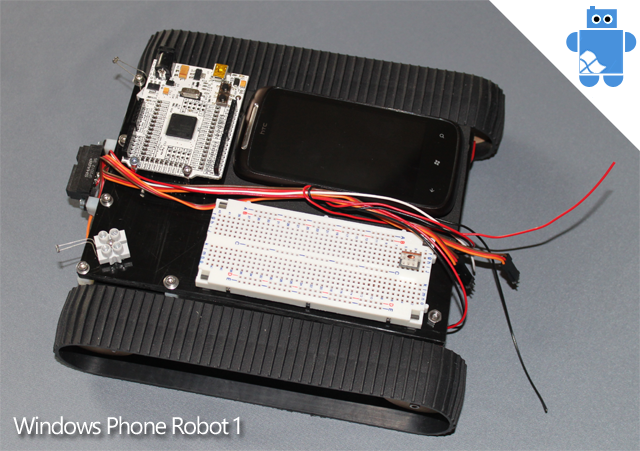
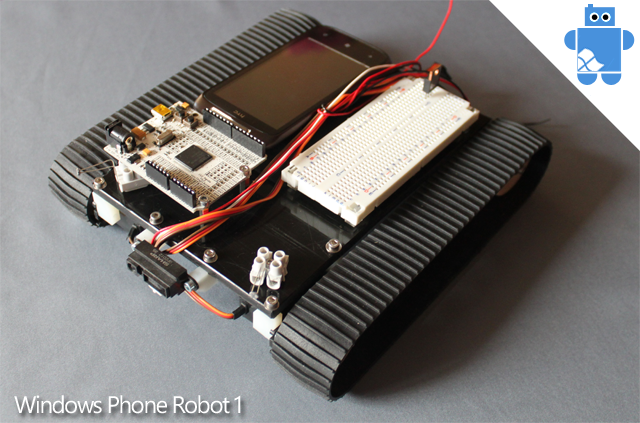
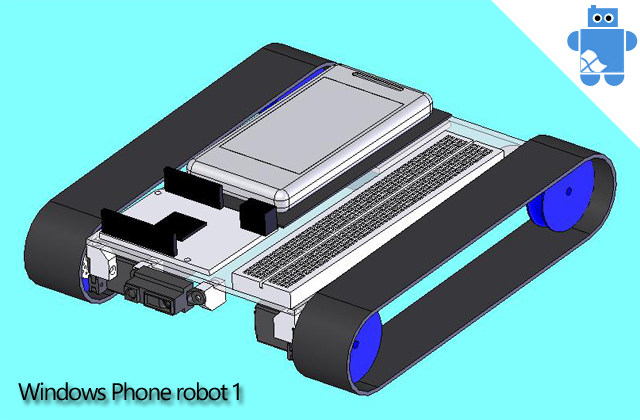
Suite de la partie 1, j’ai fini de fabriquer le robot mécaniquement parlant. Ca m’a pris 3 heures. Il me reste un peu d’électronique au niveau de l’étage d’alimentation, le câblage et puis tout le code.
Voilà quelques photos de la bête :
Following of part 1, I finish to build the mechanical part of the robot. It took me 3 hours. Now, I still have a little bit of electronic on the power supply, the wiring part and the code.
Here is some picture of the beast :
Welcome !
WPBots.com is a blog which talks about robots made in C# based on .Net MicroFramework and Windows Phone.Articles récents
- SmartBot, the Smartphone Robot – now even smarter!
- SmartBot, the smartphone robot
- SmartBot Mini : Next Episode
- SmartBot Mini : The mini robot for Smartphone
- New Windows Phone robot : little teaser
- Windows Phone Bluetooth serial port – It works !
- Bluetooth trial – part 1
- The future is Wireless
- Thank you !
- My first Windows Phone robot – Part 3
- How to engrave a PCB with a YAG laser
- My first Windows Phone robot – Part 2
- A printer for Windows Phone
- Distance measurement with Windows Phone
- My first Windows Phone robot – Part 1
- A keyboard for Windows Phone
- Windows Phone serial port – V1
- Windows Phone robots
- Once upon a time…

